ClojurescriptのQuick Startをやってみた。その時の内容をメモ。 http://niku.name/articles/2015/08/29/ClojureScript%20Quick%20Start%20%E6%97%A5%E6%9C%AC%E8%AA%9E%E8%A8%B3 の和訳記事も参考にしています。
まずは、プロジェクトのディレクトリを作成。
mkdir hello_cljs
cd    hello_cljs
clojurescriptコンパイラ
standalone ClojureScript JAR をDLしてプロジェクトのルートに配置。
MACなら例えば、
mv ~/Downloads/cljs.jar ./
このjarがコンパイラ。
アプリケーション・ソースコード
ソースコードのファイルを作成し、
mkdir -p src/hello_cljs
touch    src/hello_cljs/core.cljs
以下のように書き込む。
(ns hello-cljs.core)     ; 名前空間宣言。詳しくは後述。

(enable-console-print!)  ; consoleオブジェクトに直接出力することを許可

(println "Hello world!") ; 出力
- ClojureScriptもClojure同様、名前空間の宣言(
ns)から必ず始まる。 - 名前空間は、ファイルのパスと同じでなければならない。
すなわち、次の2つは対応している。- このファイルのプロジェクトのルートからのパス
hello_cljs.core -
nsの第一引数hello-cljs.core
- このファイルのプロジェクトのルートからのパス
- Clojure同様、ファイルパス中では、アンダーバー(
_)を使い、ns宣言ではハイフン(-)を使うことに注意。
ビルドスクリプト
ビルドスクリプトのファイルを作って、
touch build.clj
そして、以下のように書き込む。
(require 'cljs.build.api)

(cljs.build.api/build "src" {:output-to "out/main.js"})
ここまでで以下のようなファイル構成となっている。
➜  hello_cljs tree
.
├── build.clj
├── cljs.jar
└── src
    └── hello_world
        └── core.cljs

2 directories, 3 files
ビルド
以下のように、コンパイラであるcljs.jarとアプリケーションのソースコードが入ったsrcをクラスパスに指定して、build.cljのclojure.mainを実行する。
java -cp cljs.jar:src clojure.main build.clj
成功してもコンソールにログとかは出ない。代わりにoutディレクトリが出来上がっていれば成功(成果物のファイルが多いので、表示はoutディレクトリ直下までにしている)。
➜  hello_cljs tree -L 1 ./out
./out
├── cljs
├── goog
├── hello_world
└── main.js

3 directories, 1 file
ブラウザで動かす
ブラウザで動かすためにサーバからエントリポイントとなるHTMLファイルを作る。
touch index.html
そして、次のように書き込む。
<html>
    <body>
        <script type="text/javascript" src="out/main.js"></script>
    </body>
</html>
このHTMLをブラウザで開く。
MACなら例えば、
open -a Google\ Chrome index.html
画面には当然何も表示されない。そして、コンソールを開くとエラーが確認できる。

Uncaught ReferenceError: goog is not defined main.js:1
エラーを起こしているout/main.jsの1行目を見てみる。
➜  hello_cljs cat -n out/main.js
     1  goog.addDependency("base.js", ['goog'], []);
     2  goog.addDependency("../cljs/core.js", ['cljs.core'], ['goog.string', 'goog.object', 'goog.string.StringBuffer', 'goog.array']);
     3  goog.addDependency("../hello_world/core.js", ['hello_world.core'], ['cljs.core']);
GoogleClosureCompilerの依存関係の記述が見える。
base.jsが依存に追加されているようなので、base.jsを以下のように探してみる。
➜  hello_cljs find . -name 'base.js*'
./out/goog/base.js
これをindex.htmlが読み込むファイルとして、main.jsの前に読み込む。
<html>
    <body>
        <script type="text/javascript" src="out/goog/base.js"></script>
        <script type="text/javascript" src="out/main.js"></script>
    </body>
</html>
ブラウザをリロードすると、エラーが出なくなっていることがわかる。
しかし、Hello world!も表示されていない。
理由は、依存関係を解決しただけで、アプリケーションのロジックを何も起動していないから。
index.htmlにそれを書き込む。
<html>
    <body>
        <script type="text/javascript" src="out/goog/base.js"></script>
        <script type="text/javascript" src="out/main.js"></script>
        <script type="text/javascript">
            goog.require("hello_world.core"); // 「-」じゃなくて「_」なので注意
        </script>
    </body>
</html>
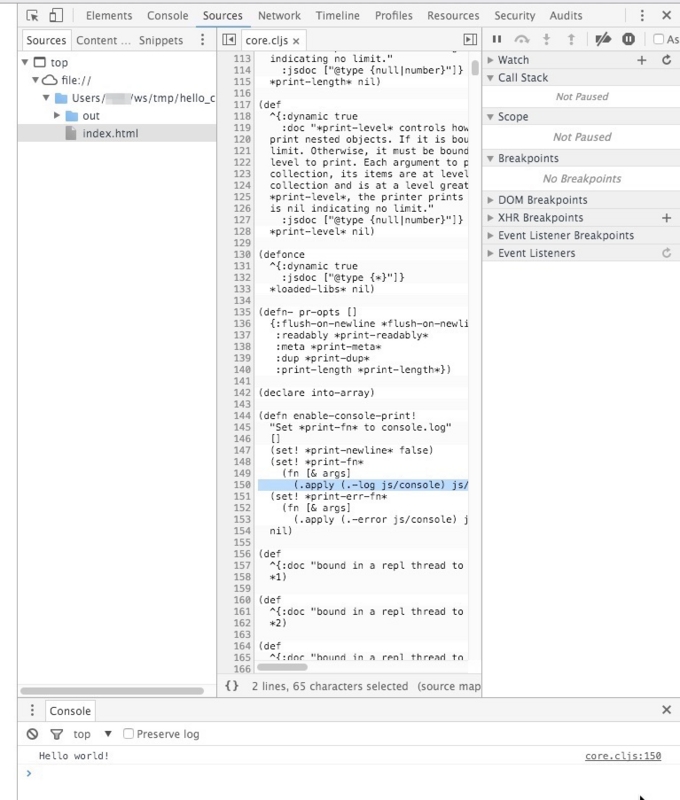
再度ブラウザをリロードすると、コンソールにHello world!が確認できる。
ビルド時に source map が出力されているので、コンソールにはcoure.cljsの行番号が出力されていることが分かる。

リファクタリング
index.htmlのgoog.require("hello_world.core");の部分は、ビルドスクリプトに:mainとしてエントリポイントを記述することで、省略できる。
build.clj
(require 'cljs.build.api)

(cljs.build.api/build "src"
                      {:main 'hello-world.core    ; エントリポイントを追記
                       :output-to "out/main.js"})
index.htmlも以下のようにすっきりと書き換える。
<html>
    <body>
        <script type="text/javascript" src="out/main.js"></script>
    </body>
</html>
三度ブラウザをリロードして、Hello world!がきちんと表示されていれば、うまくいっている。
out/main.jsを見てみると、さっきまでindex.htmlに書いていた内容がこちらに移っていることが分かる。
➜  hello_cljs cat -n out/main.js
     1  var CLOSURE_UNCOMPILED_DEFINES = null;
     2  if(typeof goog == "undefined") document.write('<script src="out/goog/base.js"></script>');
     3  document.write('<script src="out/cljs_deps.js"></script>');
     4  document.write('<script>if (typeof goog != "undefined") { goog.require("hello_world.core"); } else { console.warn("ClojureScript could not load :main, did you forget to specify :asset-path?"); };</script>');
自動ビルド
javascriptの開発でよくある、ファイルを更新したら自動で再コンパイルしてくれるスクリプトを書く。
まずファイルを作って、
touch watch.clj
以下のように書き込む。
(require 'cljs.build.api)

(cljs.build.api/watch "src"
                      {:main 'hello-world.core
                       :output-to "out/main.js"})
呼び出してる関数が、buildからwatchに変わっただけでさっきとほとんど同じ。
実行する。
java -cp cljs.jar:src clojure.main watch.clj
次のようなログが出る。
➜  hello_cljs java -cp cljs.jar:src clojure.main watch.clj
Building ...
... done. Elapsed 0.171403817 seconds
Watching paths: /Users/xxx/ws/tmp/hello_cljs/src
core.cljsを更新すると、自動で再コンパイルが走る。
➜  hello_cljs java -cp cljs.jar:src clojure.main watch.clj
Building ...
... done. Elapsed 0.171403817 seconds
Watching paths: /Users/xxx/ws/tmp/hello_cljs/src
Change detected, recompiling ...
Reading analysis cache for jar:file:/Users/xxx/ws/tmp/hello_cljs/cljs.jar!/cljs/core.cljs
Compiling src/hello_world/core.cljs
Copying file:/Users/xxx/ws/tmp/hello_cljs/src/hello_world/core.cljs to out/hello_world/core.cljs
... done. Elapsed 0.339754398 seconds
自動ビルドは、CTRL + cで終了させられる。
ブラウザREPL
まず、コマンドラインを強力にしてくれるrlwrapをインストールする。
MACなら例えばhomebrewを使って、
brew install rlwrap
続いて、REPLを起動するスクリプトを作成する。
touch repl.clj
中身は以下のように書き込む。
(require 'cljs.repl)
(require 'cljs.build.api)
(require 'cljs.repl.browser)

(cljs.build.api/build "src"
  {:main 'hello-world.core
   :output-to "out/main.js"
   :verbose true})

(cljs.repl/repl (cljs.repl.browser/repl-env)
  :watch "src"
  :output-dir "out")
core.cljsを以下のように変更する。
(ns hello-world.core
  (:require [clojure.browser.repl :as repl])) ;replのツールを読み込む

;; REPLで接続する。def ではなく defonce を使うのは、開発時にコードを書き直したりして名前空間をリロードすることがあってもコネクションを貼り直さないようにするため。
(defonce conn
  (repl/connect "http://localhost:9000/repl"))

;; ここから下は以前と一緒

(enable-console-print!)

(println "Hello world!")
実行する。
rlwrap java -cp cljs.jar:src clojure.main repl.clj
ブラウザでhttp://localhost:9000を開く。
ここで立ち上がったREPLはブラウザではなく、ターミナル。
以下のような感じでログがでて、プロンプト(cljs.user=>)が表示される。
➜  hello_cljs rlwrap java -cp cljs.jar:src clojure.main repl.clj
Copying jar:file:/Users/xxx/ws/tmp/hello_cljs/cljs.jar!/clojure/browser/event.cljs to out/clojure/browser/event.cljs
Reading analysis cache for jar:file:/Users/xxx/ws/tmp/hello_cljs/cljs.jar!/cljs/core.cljs
Compiling out/clojure/browser/event.cljs
Copying jar:file:/Users/xxx/ws/tmp/hello_cljs/cljs.jar!/clojure/browser/net.cljs to out/clojure/browser/net.cljs
Compiling out/clojure/browser/net.cljs
Copying jar:file:/Users/xxx/ws/tmp/hello_cljs/cljs.jar!/cljs/repl.cljs to out/cljs/repl.cljs
Compiling out/cljs/repl.cljs
Copying jar:file:/Users/xxx/ws/tmp/hello_cljs/cljs.jar!/clojure/browser/repl.cljs to out/clojure/browser/repl.cljs
Compiling out/clojure/browser/repl.cljs
Compiling src/hello_world/core.cljs
Copying jar:file:/Users/xxx/ws/tmp/hello_cljs/cljs.jar!/goog/labs/useragent/util.js to out/goog/labs/useragent/util.js
・・・(省略)・・・
Copying file:/Users/xxx/ws/tmp/hello_cljs/src/hello_world/core.cljs to out/hello_world/core.cljs
Compiling client js ...


Waiting for browser to connect ...
Watch compilation log available at: out/watch.log
To quit, type: :cljs/quit
cljs.user=>
ターミナルで試しに(+ 1 2)とか簡単な式を評価して、結果が返ってくればうまくいっている。
cljs.user=> cljs.user=> (+ 1 2)
3
うまくいかなかったりREPLが固まってしまったら、ブラウザをリロードする。
ビルドに関するログはout/watch.logに出ているので、もう1つターミナルを開いてtailする。
➜  hello_cljs tail -f out/watch.log
Building ...
... done. Elapsed 0.094566749 seconds
Watching paths: /Users/xxx/ws/tmp/hello_cljs/src
src/hello_world/core.cljsのコードを以下のように書き換える。
(ns hello-world.core
  (:require [clojure.browser.repl :as repl]))

(defonce conn
  (repl/connect "http://localhost:9000/repl"))

(enable-console-print!)

(println "Hello world!")

;; 以下を追記
(defn foo [a b]
  (+ a b))
out/watch.logにはコンパイルした旨、以下のような感じでログが追記される。
Change detected, recompiling ...
Compiling src/hello_world/core.cljs
Copying file:/Users/xxx/ws/tmp/hello_cljs/src/hello_world/core.cljs to out/hello_world/core.cljs
... done. Elapsed 0.087405154 seconds
REPLで、さっき書いたコードの名前空間をrequireして、追記したfoo関数を実行する。
cljs.user=> (require '[hello-world.core :as hello])
nil
cljs.user=> (hello/foo 1 2)
3
ソースコードを書きかえてリロードする。
src/hello_world/core.cljsのコードを以下のように書き換える。
(ns hello-world.core
  (:require [clojure.browser.repl :as repl]))

(defonce conn
  (repl/connect "http://localhost:9000/repl"))

(enable-console-print!)

(println "Hello world!")

(defn foo [a b]
  (* a b))      ; ここを書きかえた
require に:reloadを使うことで強制的にリロードが可能。
cljs.user=> (require '[hello-world.core :as hello] :reload)
nil
cljs.user=> (hello/foo 1 2)
2
リロードがうまくいっていれば、掛け算した結果である2が返ってくる。
リリース用ビルド
本番用のビルドスクリプトとしてrelease.cljを作る。
touch release.clj
そして、以下のように書き込む。
(require 'cljs.build.api)

(cljs.build.api/build "src"
  {:output-to "out/main.js"
   ; :main 'hello-world.core  ; 不要
   :optimizations :advanced}) ; 最適化のレベルをadvancedに。

(System/exit 0)               ; GoogleClojureCompilerが作るスレッドプールを完全にシャットダウンするため。
最適化のレベルを:advancedにすると、コンパイルした成果物が1つのjavascriptファイルになるので、エントリポイントの指定である:mainが不要になる。
そして、src/hello_world/core.cljsからREPLに関するところを除去して、以下のようにする。
(ns hello-world.core)

(enable-console-print!)

(println "Hello world!")
リリース用のビルドを実行する。
java -cp cljs.jar:src clojure.main release.clj
このプロセスは時間がかかる。
コンパイルが終わってindex.htmlをブラウザで開くと、コンソールにちゃんとHello world!が出ているはず。
Leiningen
ここまでjavaコマンドでやってきたことは、Leiningenでも実行可能。
例えば、
java -cp cljs.jar:src clojure.main release.clj
は、
lein -m clojure.main release.clj
でいける。
実際の記事は、さらにNode.jsで動かす内容が続いていくのだけれど、長くなったのでここまでで。